Powered by Blogger.

Friday, March 29, 2013

Springtime with Sister


In our neck of the woods, we got our first dose of Spring weather a couple of weekends ago. Temperatures were in the 70s, the sun was shining, the dogwoods broke out a few blooms, and the birds seemed to be chirping a little louder.  It was just the motivation I needed to finally take down the "winter" decor (aka the Christmas decor that I was too lazy to take down so I just hid baby Jesus and Santa and reclassified the nick naks as "winter") and get my girl ready for Spring.

For the boys in our family, the transition from Winter to Spring means its time to pull out last years shorts and t-shirts and see what still fits and isn't too stained to wear this year.  The whole process maybe takes 30 min per child because at this age my boys could really care less what they look like as long as it's comfortable and "not too handsome" (aka shirts with buttons).  Sister's springtime ritual, on the other hand, is a much more timely and tedious process, as you would expect with any girl.  It begins with the mother of all cleaning sessions- the Spring Cleaning.

While most normal humans dread this annual deep cleanup, for the recovering DRS* sufferer it is as anticipated as Christmas.  For it is with this deep, top to bottom, cleaning and organizing session that she believes she can finally achieve the Donna Reed Level of housekeeping perfection.  Of course, because this level of perfection is fictional, she ALWAYS burns out before the whole house has been cleaned.  This year I clocked in at 18 straight hours (started at noon burned out at 4am) of cleaning with only the Master Bathroom, Laundry Room, Dining Room, Master Closet, and Living Room achieving Spring Cleaned status. The remainder of the house got a surface dusting and a shot of fabreeze.  This was better then last years effort but didn't touch the spring 2010 cleaning-that was the year I bought a special tool to clean out the dryer lint trap AND all the bedroom furniture was moved so the vacuum could reach all those unreachable places............what a year!

After the cleaning is abandoned the next, and most fun, step in the Springification of this two-story sister is to accessorize.  Sister and I just love Springtime because it is the ONLY time of year we get to bring in a little pink to our male dominated home without too much complaint.  So after a little crafting and a little repurposing, Sister now has just a few simple pops of Springtime throughout the main living areas to give the whole family a little Spring Fever.   

Here are some pics of Sister showing off a few of her Spring touches:


Nothing Says Spring like pinwheels and bunting!


And Introducing the Dining Room


And finally, the last step to fully Springify Sister is to open her windows and let the smell and feel of Spring waft inside as I sit on my front porch swing, sipping lemonade, and watching the boys play fetch with their dog in their "handsome clothes."  Ahhh isn't that a nice visual......... Too bad I don't have a front porch, and my eldest has allergies, so the only smells of spring wafting into our home are coming from the kitchen and bathroom scentsy pots; but that's ok I don't really like lemonade anyway!  Happy Spring!!

*DRS is a fictional disease that I came up with and dedicated a whole other insane blog about several years ago until the insanity of the disease required me to shut it down.  If your curious you can sample it here.  In the real world this disease can look a lot like OCD.

Monday, February 25, 2013

Valentines Day Project


After 12 years of marriage my hubby has learned how to speak my love language.  It is spoken not with chocolates, poetry, or candle lit dinners; No- it is with his willingness to provide manual labor for my many projects without questioning the sanity of my requests.  For you see, DH (dear husband) does not share my love of projects.  While I would be content to have a project going every weekend, he would much rather spend his weekends relaxing or doing something fun (which oddly enough, he does not put projects in that "fun" category).  So you can imagine how my heart swelled with love when he announced on Valentines Day that he would be my project slave for the upcoming weekend!!

Now, while I wasn't about to turn down his offer, his unexpected gift did cause a moment of panic to this recovering OCD sufferer because, you see, my 2013 Project Calendar did not have a major "require the hubby's full assistance" project down until August.  Well, good thing I am sooooo laid back these days because I just totally scratched thru "make office bulletin board" for my February project and wrote in "Wood Planked Walls in Living Room" in it's place.  Yep, Sister's main living area got wrapped in a wooden hug Valentines weekend.  

Here are a few pictures of Sister before Valentines Weekend:


Please ignore the hodge podge of furniture (this is the room all the left over furniture landed 3+ years ago when we moved in and has yet to leave).  For now, lets just focus on the walls.  Before the makeover they were painted in Sherwin Williams, Sawdust.  I really liked the color but Sister has her heart set on being a cottage rather than the traditional colonial girl she was born to be, and a cottage needs wood planked white washed walls.  So let the make-over begin....

DH and I have put up a wood wall in another room (another post at another time) but I wanted a different look than what we had done in the past.  So I scoured the internet looking for tips on how to best go about the project with ease of skill and money. With the help of pinterest I landed on one of my favorite blogs The House of Smiths.  The Smiths followed the diy advice from Sweet Pickens Furniture to wood wrap their dining room and so I took full advantage of all suggestions given from both blogs when approaching my project.  Since they did such a thorough job explaining the process I am just going to share a few "during" pictures so you will believe that DH and I really did do the work;)

I very sloppily painted the walls white before the plank went up so that you 
wouldn't be able to see the green between the planks.
Me sanding the boards
DH cutting the boards (He deserves an extra big picture because he was such a trooper during 
this project and because he looks extra cute in his pajama pants and looks like a 
real live carpenter with his safety goggles and pen in his mouth)
Planks going up

We started the project at 6pm on Friday night and stopped around 11pm that night.  Then we were rolling again by 8am with a break from 10am-1pm to restock on wood and an Upward Basketball game.  The planking was complete and room put back together by 6:30 Saturday night.  The project started strong with DH being meticulous about making sure each plank was level but by the end we were just eye balling the boards and at least every other sentence out of one of our mouths was "I am sure the paint will hide that" and "cottage style isn't meant to be perfect." I also overheard DH say under his breath several times "I did sign up for this."  That's right, honey, you did; and in the end it looked great!

And now I must confess something that will probably disqualify me from the diy blogland community. We hired someone to paint the planks.  Yes, that is right, over the years I have learned that I am a horrible painter of walls.  Give me any type of furniture and I will be perfectly happy to paint it (i.e. the TV stand, side tables, 123 chairs, the "&" can in the background in the pictures above are all painted by me) but I have an inability to successfully paint walls.  I think it is my OCD, if I get one smudge of paint outside of the desired perimeters I go nutso.  I can't tell you how many ceilings I have painted the color of my walls because I kept accidentally "cutting in" on the ceiling.  

So with a HUGE thanks to Nicholas the Painter I present the "after" pictures of Sister's cottage style white wood planked walls!!


So pleased with the walls but now that colonial style mantle is sticking out like a soar thumb.  Oh the plans I have for you, dear mantle..... all in good time.  Stay tuned...


Sunday, January 20, 2013

The Kitchen


I feel like this post should be the grand finale of the last 3.5 years of Sister projects so I hate to pull it out as the very first Before and After post but the below pictures are the whole reason I have started this blog at this time.  I had posted my "Before" pictures about 5 months ago on Facebook but then got convicted that bombarding FB with all my "After" pics might come across as a little, I don't know, braggy.  Sooooo I started this little blog so those that really want to see my "After" kitchen could visit and those that didn't would never have to grace this site.  
(Footnote: for those that do post Before and After pics on FB please don't stop, I personally love them!)
Anyways..... Let me first introduce you to the Kitchen we moved into:

First up is the eating nook complete with the bubble curtain top that came with the house

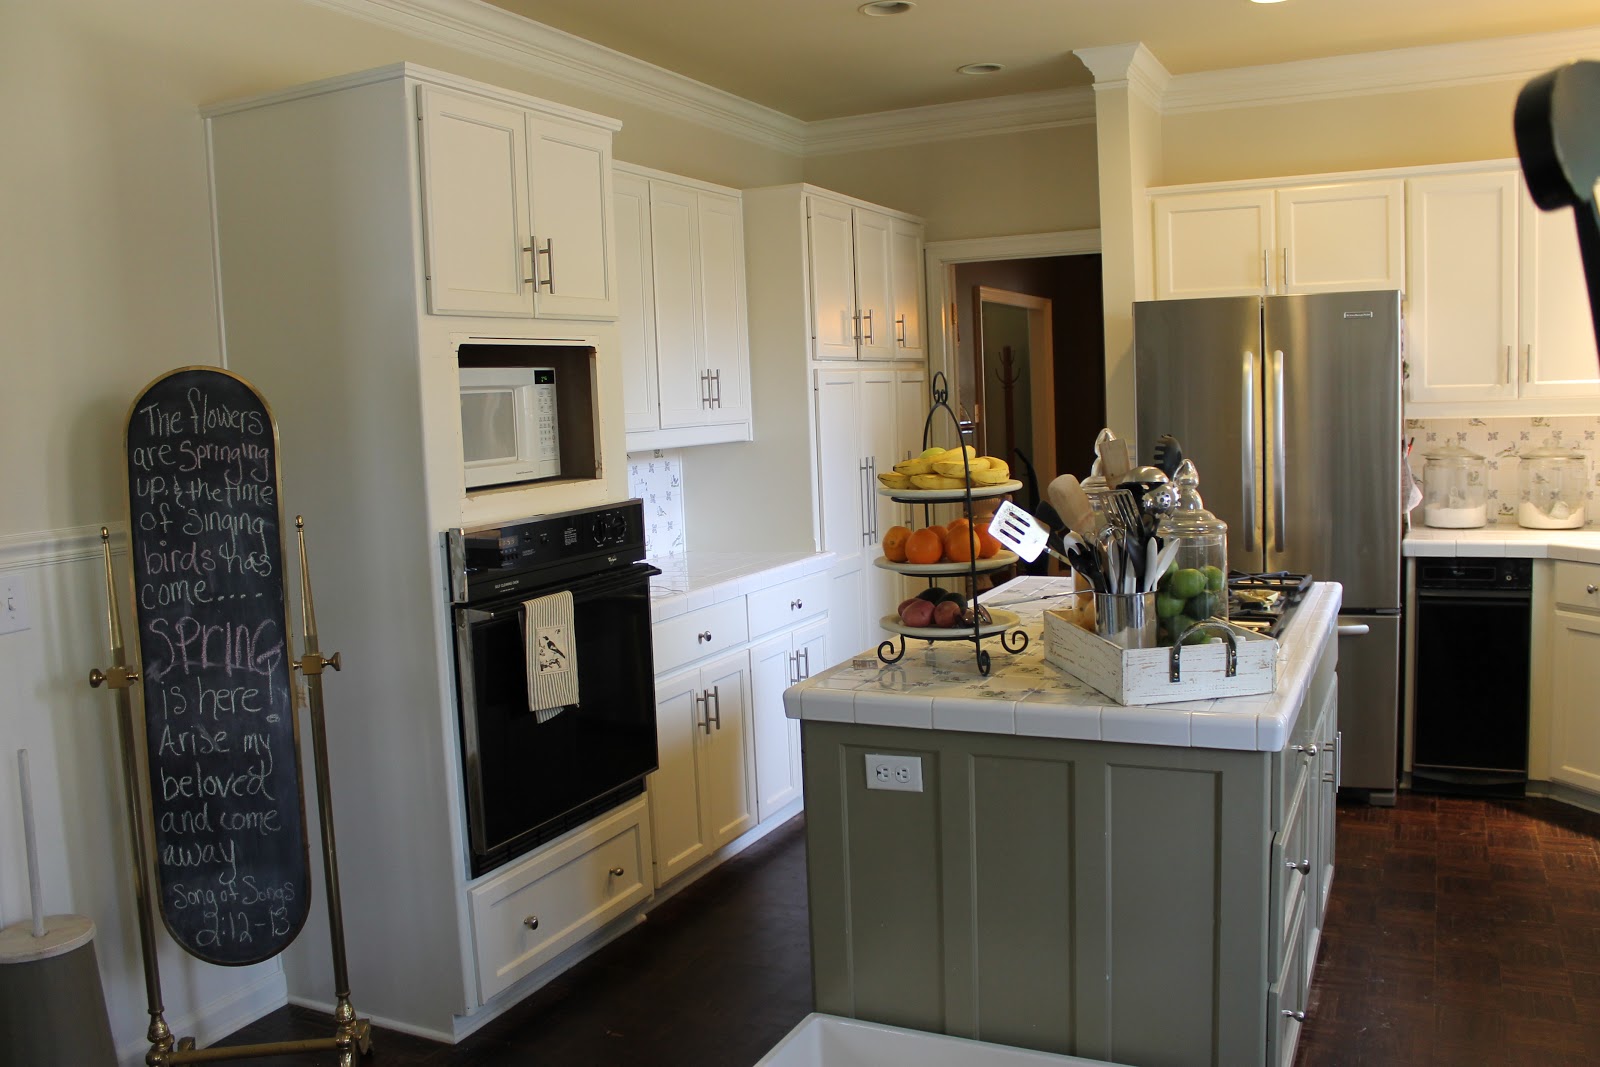
Next we move into the main kitchen area.  Certainly NOT the worst kitchen in the world, just not my style and had some dated soon-to-go-out appliances.  

And now the inspiration for the whole kitchen remodel.... the back splash and island tile:


Yep, take a closer look.... Not only did I have chickens and roosters but also peacocks and pheasants grouted into my counter tops.  These feathered fowl kept me motivated for over 3 years to stuff the "kitchen remodel" envelope with every extra penny that came my way. 

Soon after we moved to Sister we did make some small changes to the kitchen with new paint on the walls and on the kitchen island.  Plus we went ahead and took down the pot rack and replaced a few of the appliances out of necessity.   


and the other side

Very livable, but those darn birds still haunted me.  Plus the space above the cabinets completely stressed me out.  And over the last 3 years of living and working out of this space I had cooked up some other ideas that I was hoping I could incorporate into the remodel. 

So in August 2012 I had finally saved up enough to begin the remodel.  Unlike most of my home improvement projects I hired a real live cabinet carpenter to do the majority of the work.  So here is the list of what I wanted to accomplish in the remodel:
  • NEW counter tops- cue the Hallelujah choir!!
  • New back splash
  • Add upper cabinets above existing cabinets.
  • Extension of the island counter top to allow for a bar
  • Remove upper cabinets above the coffee pot and replace with open shelves
  • New Farm House sink
  • Add glass fronts to a couple of cabinets.
  • Remove nonworking trash compactor and replace with cabinet and spice pull-out.
  • Rebuild the oven/microwave unit and add a broom closet.
  • Add corbels under upper cabinets to give it more of a cottage flair.
  • Paint cabinets.
  • New lighting- pendants above island and new light above table.
And after 2 months of complete chaos here is the finished product.  Drum Roll..............

Eating Area with reclaimed turkey feeder turned light.

New Glass Front Cabinets


New Open Shelves.

And the NEW COUNTER TOPS!!!! Bye Bye Birdies!!!!
Granite on the island
Quartz on the Perimeter

And finally the entry area into the kitchen from the mud room.  Oh! and meet Cooper the newest 
member of our family.

Well there it is.  Just have a few more finishing touches and decor I'd like to add but otherwise 
this project is complete.   Thanks for stopping by!!


Two Story Sister

The Lord knew what he was doing when he blessed me with two boys but I gotta admit there is a BIG part of me that longs to dress up a little girl in head to toe pink complete with a ginormous bow taped to her precious head.... sigh.  But alas, I could not talk the hubby into going for baby number 3 so I have had to accept that I will never shop at Justice or visit the American Doll store (double sigh), a fact that I struggled with UNTIL one day it hit me......... I could use the energy and money I would have used to doll up a little girl to dress up my HOUSE!!! Genius!! Now granted, I still worry about who will shop with me on Black Friday and who will take me in when I am old and decrepit, but otherwise, this new mindset has brought me much peace.  
Now the boys do think it is a little weird that I refer to our home as Sister but just think about the many advantages this plan offers:

  • Sister won't have an opinion about how I dress her.
  • Sister won't talk back.
  • Sister won't argue with her brothers.
  • Sister won't be dating.
  • Sister won't miss her curfew
  • Sister will always welcome me no matter the time of the month.
Just to name a few.
So let me introduce you to the entire family

My two boys and husband


 and the star of this blog- Sister

(and just like a third child, I could only find this one picture of Sister at Christmas 3 years ago)

Saturday, January 19, 2013

I'm Back!!!


Hello World Wide Web!!!  I am soooo excited to rejoin the blogworld after a almost 4 year hiatus.  This new blog is going to be TOTALLY different from the old one in soooo many ways:
  1. I have promised my family I will NOT let this blog overtake my life like the last one (really, I won't).
  2. No coupons! I mean, I'm not going to promise I will never mention a deal alert, but that's not going to be the focus of this blog. 
  3. No daily themes (see #1).  I might not even post weekly! Seriously, this is going to be one laid back blog.
The purpose of this blog is to chronicle my home improvement projects.  Not that I think my projects are extra spectacular its just that over the years I have taken countless ideas off of decorating blogs and more recently, Pinterest, that I thought I would give back just in case someone out there might find inspiration in my projects.

So without further a due, I introduce to you Two Story Sister